UI: Global Controls (Pass 3)
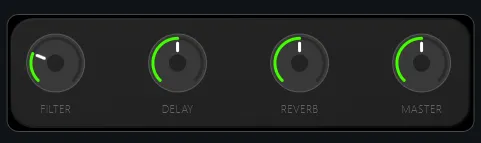
This pass adds the four global controls — filter, delay, reverb, and master
volume — as a panel sitting above the step grid. Two forms are needed: a
reusable single-knob form (main_knob) and a grouping form (main_controls)
that instantiates it four times.
The main_knob Form
Section titled “The main_knob Form”Create the Form
Section titled “Create the Form”Right-click patches -> main -> ui and choose Create new Form. Name it
main_knob.
# form: "main_knob"
width: 60height: 90controls:  cutoff:    anchors: { hCenter: 0, top: 0, width: 60, height: 60 }    type: knob    props:      parameterUid: "$parameterUid"  cutoff.label:    anchors: { bottom: 0, left: 0, right: 0, height: 30 }    type: text    props:      text: "$title"
This form needs no Lua script. The knob’s parameterUid prop accepts the
$parameterUid macro directly — the platform resolves the macro and wires the
knob to the named parameter automatically. The parent form passes in a different
UID for each instance and the correct parameter is connected without any
additional code.
Press Apply after entering the YAML.
The main_controls Form
Section titled “The main_controls Form”Create the Form
Section titled “Create the Form”Create another new form and name it main_controls.
Assign Names and Copy the Required UID
Section titled “Assign Names and Copy the Required UID”Before entering the YAML, set up references for the three parameters needed: delay send level, reverb send level, and master volume.
Assign names to the send level knobs. In the main.flr layer editor,
right-click the send level knob for the delay send, choose Assign name,
and enter send_levels/delay. Repeat for the reverb send level knob, entering
send_levels/reverb. These names can then be used directly in the YAML —
no UID copy-paste needed.
Copy the master Amp’s volume UID. Right-click the Vol. knob on the master Amp processor and choose Copy Parameter UID. Keep this somewhere you can paste from — it goes into the YAML below. (This knob is left as a raw UID deliberately, to show that both approaches are always interchangeable.)
# form: "main_controls"
width: 460height: 110controls:  bg.image:    anchors: { left: 0, top: 0, right: 0, bottom: 0 }    type: image    props:      image: main_controls_bg.svg
  cutoff:    pos: { x: 15, y: 15, w: 60, h: 90 }    type: subForm    props:      form: main_knob      macroParameters:        $title: FILTER        $parameterUid: "externalCutoff"  delay:    pos: { x: 137, y: 15, w: 60, h: 90 }    type: subForm    props:      form: main_knob      macroParameters:        $title: DELAY        $parameterUid: "send_levels/delay"  reverb:    pos: { x: 259, y: 15, w: 60, h: 90 }    type: subForm    props:      form: main_knob      macroParameters:        $title: REVERB        $parameterUid: "send_levels/reverb"  master:    pos: { x: 381, y: 15, w: 60, h: 90 }    type: subForm    props:      form: main_knob      macroParameters:        $title: MASTER        $parameterUid: <copy+paste master Amp's volume knob UID>
Replace the <copy+paste … UID> placeholder for master with the UID you
copied above.
The filter knob uses the global parameter name externalCutoff directly. The
delay and reverb knobs use the names assigned just above. Only the master volume
uses a raw UID — all three approaches resolve identically at runtime; the choice
is purely about readability.
Press Apply after entering the YAML.
Wire into the Main Form
Section titled “Wire into the Main Form”Open the main form’s YAML and add the master entry to the controls block:
width: 700height: 560controls:  bg_image:    anchors: { left: 0, top: 0, right: 0, bottom: 0 }    type: image    props:      image: plugin_bg.png
  steps:    pos: { x: 30, y: 63, w: 640, h: 72 }    type: subForm    props:      form: step_grid
  stepControls:    pos: { x: 30, y: 155, w: 640, h: 82 }    type: subForm    props:      form: step_controls
  master:    pos: { x: 120, y: 274, w: 460, h: 110 }    type: subForm    props:      form: main_controls
  keyboard:    pos: { x: 5, y: 423, w: 690, h: 130 }    type: subForm    props:      form: keyboard
Press Apply. The global controls panel appears between the per-step controls and the keyboard.
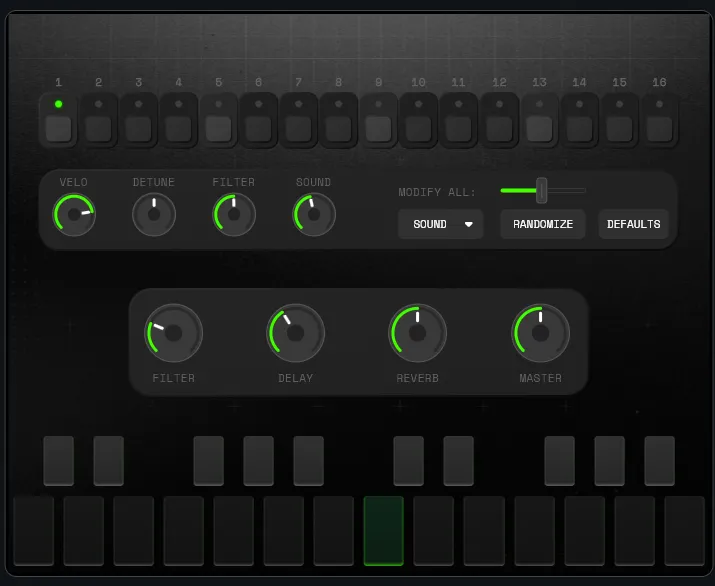
The core instrument is now fully functional. The sequencer plays, each step’s parameters are independently editable, batch randomise works, and the four global controls shape the overall character of the sound.
Take a moment to play with what you have built: hold a key, let the pattern run, and use the global filter knob to sweep the sound. Try the per-step randomiser on different targets. Change notes on the keyboard mid-playback. This is a good point to get a feel for how the controls interact before moving on.
Expose the Filter to DAW Automation
Section titled “Expose the Filter to DAW Automation”With the instrument feeling good, there is one housekeeping step before moving
on: registering externalCutoff as an automatable parameter so the DAW can
record and replay filter sweeps.
Automatable parameters require a resolved UID — the parameter’s internal
identifier — not just its name. Open Patch Settings → Global Parameters,
find externalCutoff in the list, and right-click it to copy its UID.
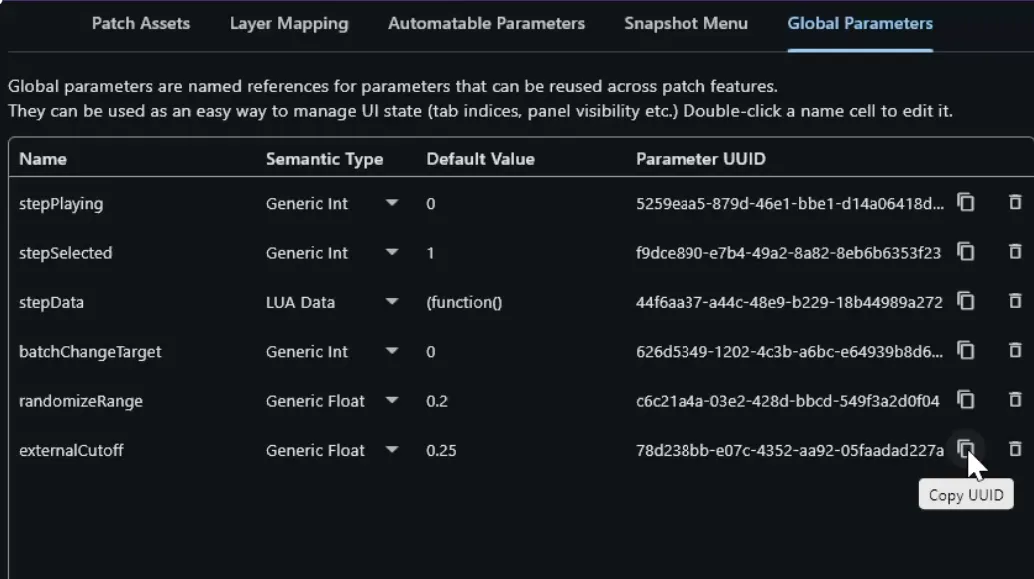
Now switch to the Automatable Parameters tab in Patch Settings. Click +
to add a new entry, paste in the UID you just copied, and set its display name
to Filter — this is the label the DAW will show in its automation lanes.
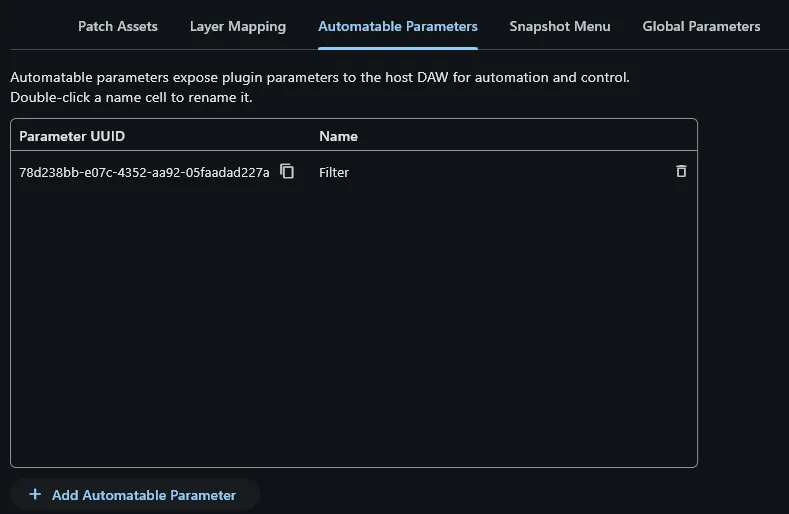
The filter is now fully automation-ready. The DAW sees it as a named parameter,
and because externalCutoff feeds through the RT script’s conversion function,
any automation recorded against it will play back correctly regardless of
whether the UI is open.
The only remaining piece is the spectrum visualizer, covered in the next chapter.